
Understanding Toilet Tank Bolt Leaks
Identifying the Problem
When it comes to troubleshooting toilet leaks, one of the most common culprits is a faulty tank bolt. These bolts secure the tank to the bowl, and if they become loose or deteriorate over time, they can cause water to leak from the tank into the bowl or onto the floor. Identifying the problem early is key to preventing further damage and costly repairs.
Gathering the Necessary Tools
Before diving into the repair process, it’s important to gather the necessary tools and materials. You’ll typically need an adjustable wrench, screwdriver, pliers, and a replacement tank bolt kit, which can be found at most hardware stores. Having everything on hand will streamline the repair process and ensure that you’re prepared for any unexpected challenges that may arise.
Shutting Off the Water Supply
Before attempting any repairs, it’s essential to shut off the water supply to the toilet to prevent any further leaks or flooding. Locate the shut-off valve, which is typically located behind or near the toilet, and turn it clockwise until the water flow stops. Flushing the toilet once or twice will help drain any remaining water from the tank and bowl, making it easier to work on.
Removing the Tank Lid
With the water supply shut off, carefully remove the tank lid and set it aside in a safe place. Inspect the interior of the tank for any visible signs of damage or corrosion, paying close attention to the area around the tank bolts. If you notice any cracks, rust, or deterioration, it may be time to replace the tank bolts and washers to prevent further leaks.
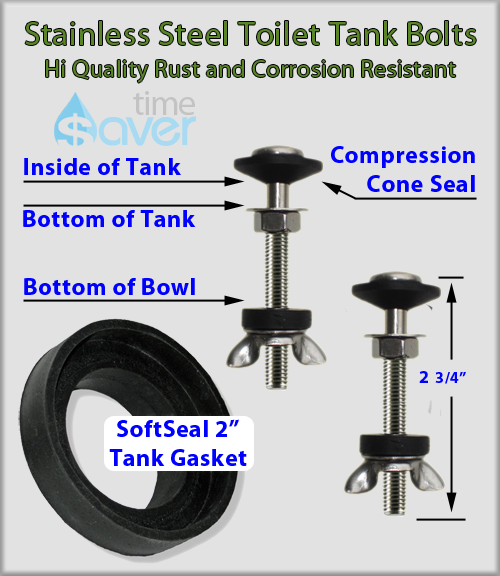
Inspecting the Tank Bolts and Washers
Next, inspect the tank bolts and washers for signs of wear or damage. Oftentimes, leaks occur when the washers become worn out or deteriorate over time, allowing water to seep through. If the bolts are loose or the washers are cracked, it’s essential to replace them to ensure a tight seal and prevent future leaks.
Replacing the Tank Bolts and Washers
To replace the tank bolts and washers, start by loosening the nuts located on the underside of the tank using an adjustable wrench or pliers. Once the nuts are removed, carefully lift the tank off of the bowl and set it aside. Remove the old bolts and washers, and replace them with the new ones included in the replacement kit. Tighten the nuts securely to ensure a watertight seal.
Reattaching the Tank to the Bowl
With the new tank bolts and washers in place, carefully lower the tank back onto the bowl, making sure to align the bolts with the corresponding holes in the bowl. Once the tank is in position, reattach the nuts to the bolts and tighten them securely using an adjustable wrench or pliers. Be careful not to overtighten, as this can cause damage to the tank or bowl.
Testing for Leaks
With the tank securely reattached to the bowl, turn the water supply back on and allow the tank to fill. Once the tank is full, flush the toilet several times and check for any signs of leaks around the tank bolts and washers. If you notice any leaks, tighten the nuts further or replace the bolts and washers again as needed until the leaks are resolved.
Replacing the Tank Lid and Restoring Water Supply
Once you’re confident that the leaks have been resolved, carefully replace the tank lid and restore the water supply by turning the shut-off valve counterclockwise. Flush the toilet again to ensure that everything is functioning properly, and monitor for any signs of leaks over the next few days to confirm that the repair was successful. Read more about toilet leaking from tank bolts